Transforms on Rotated Bounding Boxes
This example illustrates how to define and use rotated bounding boxes.
Note
Support for rotated bounding boxes was released in TorchVision 0.23 and is currently a BETA feature. We don’t expect the API to change, but there may be some rare edge-cases. If you find any issues, please report them on our bug tracker: https://github.com/pytorch/vision/issues?q=is:open+is:issue
First, a bit of setup code:
from PIL import Image
from pathlib import Path
import matplotlib.pyplot as plt


import torch
from torchvision.tv_tensors import BoundingBoxes
from torchvision.transforms import v2
from helpers import plot

plt.rcParams["figure.figsize"] = [10, 5]
plt.rcParams["savefig.bbox"] = "tight"

# if you change the seed, make sure that the randomly-applied transforms
# properly show that the image can be both transformed and *not* transformed!
torch.manual_seed(0)

# If you're trying to run that on Colab, you can download the assets and the
# helpers from https://github.com/pytorch/vision/tree/main/gallery/
orig_img = Image.open(Path('../assets') / 'leaning_tower.jpg')
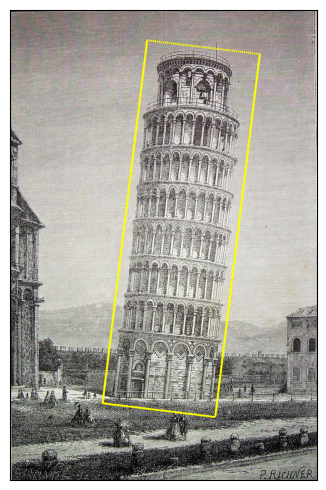
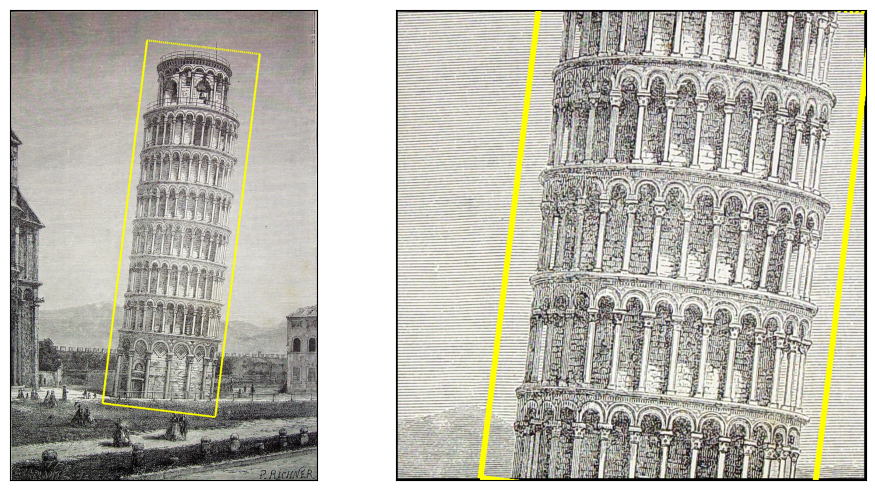
Creating a Rotated Bounding Box
Rotated bounding boxes are created by instantiating the
BoundingBoxes class. It’s the format
parameter of the constructor that determines if a bounding box is rotated or
not. In this instance, we use the CXCYWHR
BoundingBoxFormat. The first two values are
the X and Y coordinates of the center of the bounding box. The next two
values are the width and height of the bounding box, and the last value is the
rotation of the bounding box, in degrees.
orig_box = BoundingBoxes(
    [
        [860.0, 1100, 570, 1840, -7],
    ],
    format="CXCYWHR",
    canvas_size=(orig_img.size[1], orig_img.size[0]),
)

plot([(orig_img, orig_box)], bbox_width=10)
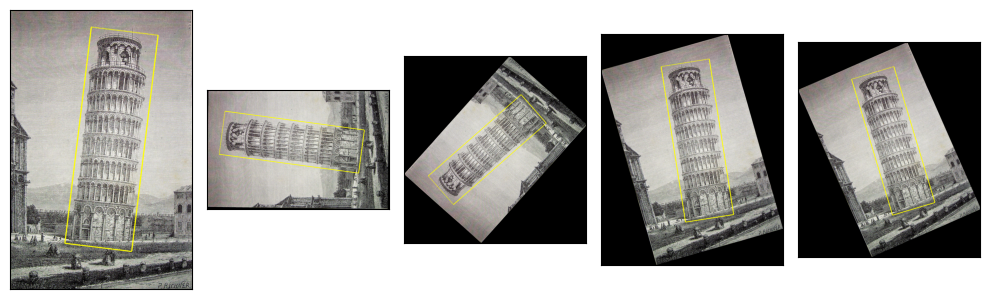
Transforms illustrations
Using RandomRotation:
rotater = v2.RandomRotation(degrees=(0, 180), expand=True)
rotated_imgs = [rotater((orig_img, orig_box)) for _ in range(4)]
plot([(orig_img, orig_box)] + rotated_imgs, bbox_width=10)
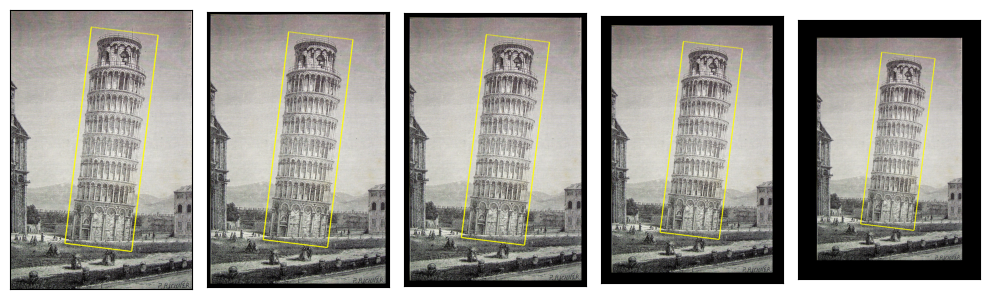
Using Pad:
padded_imgs_and_boxes = [
    v2.Pad(padding=padding)(orig_img, orig_box)
    for padding in (30, 50, 100, 200)
]
plot([(orig_img, orig_box)] + padded_imgs_and_boxes, bbox_width=10)
Using Resize:
resized_imgs = [
    v2.Resize(size=size)(orig_img, orig_box)
    for size in (30, 50, 100, orig_img.size)
]
plot([(orig_img, orig_box)] + resized_imgs, bbox_width=5)
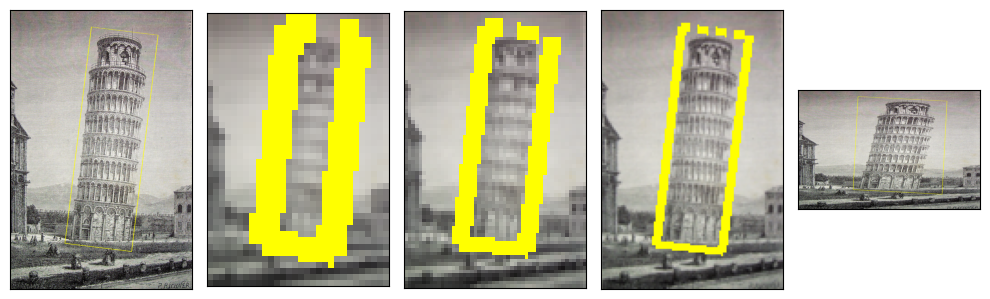
Note that the bounding box looking bigger in the images with less pixels is an artifact, not reality. That is merely the rasterised representation of the bounding box’s boundaries appearing bigger because we specify a fixed width of that rasterized line. When the image is, say, only 30 pixels wide, a line that is 3 pixels wide is relatively large.
Clamping Mode, and its effect on transforms
Some transforms, such as CenterCrop, may
result in having the transformed bounding box partially outside of the
transformed (cropped) image. In general, this may happen on most of the
geometric transforms.
In such cases, the bounding box is clamped to the transformed image size based
on its clamping_mode attribute. There are three values for
clamping_mode, which determines how the box is clamped after a
transformation:
None: No clamping is applied, and the bounding box may be partially outside of the image.“hard”: The box is clamped to the image size, such that all its corners are within the image canvas. This potentially results in a loss of information, and it can lead to unintuitive resuts. But may be necessary for some applications e.g. if the model doesn’t support boxes outside of their image.
“soft”: . This is an intermediate mode between
Noneand “hard”: the box is clamped, but not as strictly as in “hard” mode. Some box dimensions may still be outside of the image. This is the default when constuctingBoundingBoxes.
Note
For axis-aligned bounding boxes, the “soft” and “hard” modes behave the same, as the bounding box is always clamped to the image size.
Let’s illustrate the clamping modes with
CenterCrop transform:
assert orig_box.clamping_mode == "soft"

box_hard_clamping = BoundingBoxes(orig_box, format=orig_box.format, canvas_size=orig_box.canvas_size, clamping_mode="hard")

box_no_clamping = BoundingBoxes(orig_box, format=orig_box.format, canvas_size=orig_box.canvas_size, clamping_mode=None)

crop_sizes = (800, 1200, 2000, orig_img.size)
soft_center_crops_and_boxes = [
    v2.CenterCrop(size=size)(orig_img, orig_box)
    for size in crop_sizes
]

hard_center_crops_and_boxes = [
    v2.CenterCrop(size=size)(orig_img, box_hard_clamping)
    for size in crop_sizes
]

no_clamping_center_crops_and_boxes = [
    v2.CenterCrop(size=size)(orig_img, box_no_clamping)
    for size in crop_sizes
]

plot([[(orig_img, box_hard_clamping)] + hard_center_crops_and_boxes,
      [(orig_img, orig_box)] + soft_center_crops_and_boxes,
      [(orig_img, box_no_clamping)] + no_clamping_center_crops_and_boxes],
     bbox_width=10)
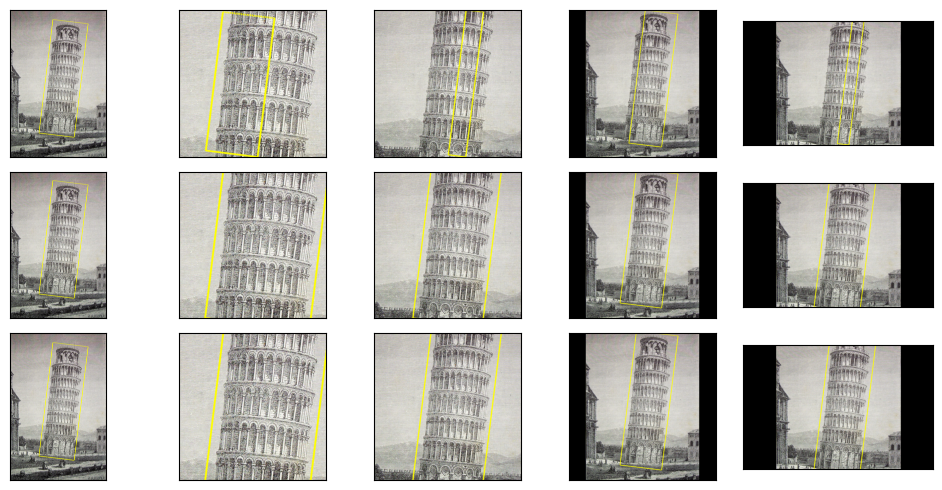
The plot above shows the “hard” clamping mode, “soft” and None, in this
order. While “soft” and None result in similar plots, they do not lead to
the exact same clamped boxes. The non-clamped boxes will show dimensions that are further away from the image:
print("boxes with soft clamping:")
print(soft_center_crops_and_boxes)
print()
print("boxes with no clamping:")
print(no_clamping_center_crops_and_boxes)
boxes with soft clamping:
[(<PIL.Image.Image image mode=RGB size=800x800 at 0x7F33932B0A90>, BoundingBoxes([[478.8188, 400.9185, 570.0000, 874.1443,  -7.0000]], format=BoundingBoxFormat.CXCYWHR, canvas_size=(800, 800), clamping_mode=soft)), (<PIL.Image.Image image mode=RGB size=1200x1200 at 0x7F33932B05E0>, BoundingBoxes([[ 678.9319,  600.0001,  569.9992, 1278.9989,   -7.0000]], format=BoundingBoxFormat.CXCYWHR, canvas_size=(1200, 1200), clamping_mode=soft)), (<PIL.Image.Image image mode=RGB size=2000x2000 at 0x7F33932B1C00>, BoundingBoxes([[1089.0000,  918.0000,  570.0001, 1840.0000,   -7.0000]], format=BoundingBoxFormat.CXCYWHR, canvas_size=(2000, 2000), clamping_mode=soft)), (<PIL.Image.Image image mode=RGB size=2364x1542 at 0x7F33932B1CC0>, BoundingBoxes([[1260.9314,  771.0001,  570.0002, 1623.5675,   -7.0000]], format=BoundingBoxFormat.CXCYWHR, canvas_size=(1542, 2364), clamping_mode=soft))]

boxes with no clamping:
[(<PIL.Image.Image image mode=RGB size=800x800 at 0x7F33932B2050>, BoundingBoxes([[ 489.,  318.,  570., 1840.,   -7.]], format=BoundingBoxFormat.CXCYWHR, canvas_size=(800, 800), clamping_mode=None)), (<PIL.Image.Image image mode=RGB size=1200x1200 at 0x7F33932B3910>, BoundingBoxes([[ 689.,  518.,  570., 1840.,   -7.]], format=BoundingBoxFormat.CXCYWHR, canvas_size=(1200, 1200), clamping_mode=None)), (<PIL.Image.Image image mode=RGB size=2000x2000 at 0x7F33932B3A00>, BoundingBoxes([[1089.,  918.,  570., 1840.,   -7.]], format=BoundingBoxFormat.CXCYWHR, canvas_size=(2000, 2000), clamping_mode=None)), (<PIL.Image.Image image mode=RGB size=2364x1542 at 0x7F33932B2A10>, BoundingBoxes([[1271.,  689.,  570., 1840.,   -7.]], format=BoundingBoxFormat.CXCYWHR, canvas_size=(1542, 2364), clamping_mode=None))]
Setting the clamping mode
The clamping_mode attribute, which determines the clamping strategy that
is applied to a box, can be set in different ways:
When constructing the bounding box with its
BoundingBoxesconstructor, as done in the example above.By directly setting the attribute on an existing instance, e.g.
boxes.clamping_mode = "hard".By calling the
SetClampingModetransform.
Also, remember that you can always clamp the bounding box manually by
calling the ClampBoundingBoxes() transform!
Here’s an example illustrating all of these option:
t = v2.Compose([
    v2.CenterCrop(size=(800,)),  # clamps according to the current clamping_mode
                                 # attribute, in this case set by the constructor
    v2.SetClampingMode(None),  # sets the clamping_mode attribute for future transforms
    v2.Pad(padding=3),  # clamps according to the current clamping_mode
                        # i.e. ``None``
    v2.ClampBoundingBoxes(clamping_mode="soft"),  # clamps with "soft" mode.
])

out_img, out_box = t(orig_img, orig_box)
plot([(orig_img, orig_box), (out_img, out_box)], bbox_width=10)
Total running time of the script: (0 minutes 6.830 seconds)
